


Whether you are dealing with a new construction or a remodel project the specifics of the linear drain installation depend on a number of varying factors: site conditions, waterproofing method, waste pipe location, curbed or no curb, slope/pitch. Whatever your need we have the right product for you specific project no matter if you choose one of our 8 standard sized linear drain or a Custom Service which allows you to specify the length and location of the outlet in the lower channel. With an industry leading 72hr turn-around time you can rest assured your project will remain on schedule. Please contact us with questions regarding your specific installation.
*The information provided in this package are general guidelines and a licensed professional should always be used when installing our products.
Linear Drain Handbook PDF
Lorem ipsum dolor sit amet, consectetuer adipiscing elit, sed diam nonummy nibh euismod tincidunt ut laoreet dolore magna aliquam erat volutpat.
Wall to wall span
Off the wall
Barrier Drain
Bath Tub Replacement
Opposite Ends
Long Length Barrier
A traditional center drain requires your wet (shower) area to be sloped/pitched in 4 directions typically referred to as a 4-way slope/pitch, requires a curb and limits tile size choice to small sized tiles which in turn requires many grout lines which are hard to clean and are not waterproof.
A linear/channel drain gives you the ability to pitch your floor in one direction opening up design possibilities and time savings. You can use large format tiles, limiting the amount of grout lines. Have the option to do a curbless entrance for easy entry and ADA compliance. With 4 unique grate top options to choose you can match any design style.
Whether it be a new construction or a remodel the position of the linear drain is dependent on the waste line location. This location can be either pre-determined or already existent. If already existent, depending on site conditions, the waste line can be moved. If not our Custom service allows you to specify the overall length and position of the outlet in the lower channel. With an industry leading 72hr turn-around time you can rest assured your project will remain on schedule.
Your sub floor must meet local code requirements and Tile Council of North America (TCNA) guidelines, make sure it is clean, smooth and level.
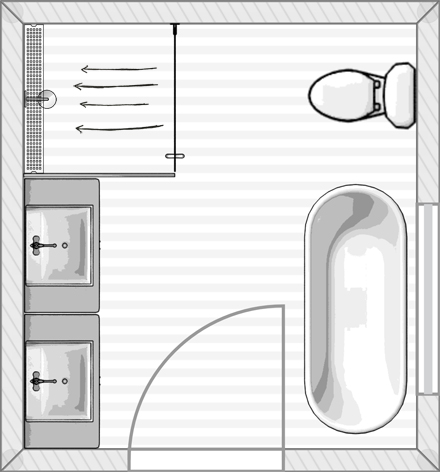
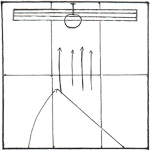
WALL-TO-WALL INSTALLATION
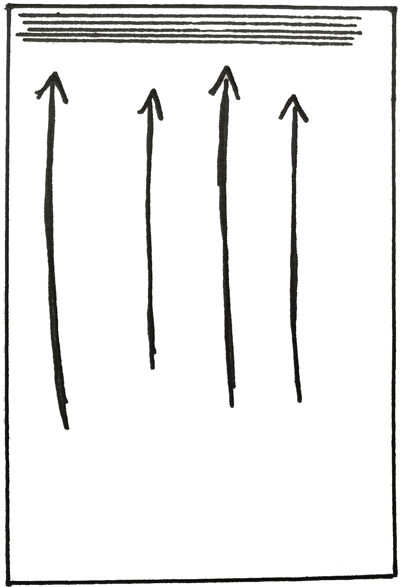
This type of installation is achieved when the linear drain touches each side wall allowing for a true 1-way fall of your tiles ensuring proper drainage. It is also a great way to create a completely seamless and modern look. To get a wall to wall placement pre-planning is crucial along with flexibility in your wet area plans. If you do not have the flexibility in modifying your plans our Custom Service allows you to specify the length and outlet position along the lower channel to meet your needs.
Recommended Products:
Both the DERA-Line and GARDA-Line standard or custom are equally well suited to a wall-to-wall installation. If one of our 9 standard sizes (30,32,36,40,44,48,54,60,72 inch) does not work and you do not have flexibility in your plans our custom option allows you to specify an overall length and the position of the outlet in the lower channel. DERA-Line is more suited towards a mechanical clamp down drain, traditional liner waterproofing installation while the GARDA-Line is better suited to using a bonded membrane (GARDA Membrane) or liquid waterproofing.
Installed tight against
wall with a 1-way
slope/pitch
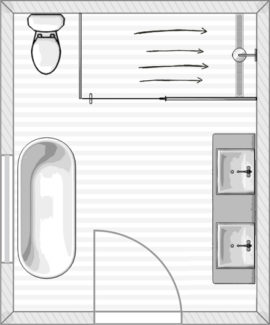
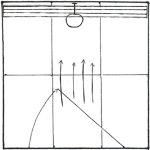
OFF WALL INSTALLATION
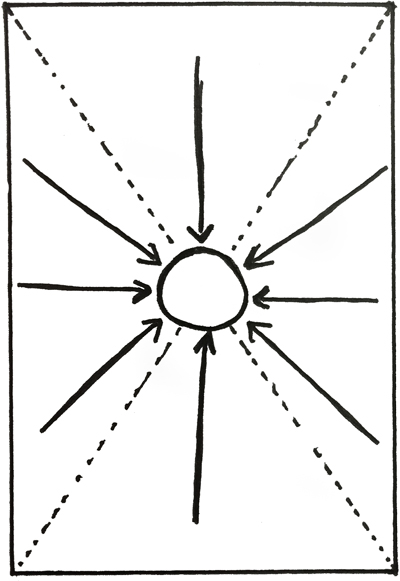
Off the wall installations are when the linear drain does not touch 1 or more walls. This can be either off a back wall, just the side walls or not touching any walls. In a curbed wet (shower) area or when not installing as a barrier drain this placement is purely aesthetic to showcase your tile. When choosing this placement the main area along with the remaining off the wall areas must all be sloped towards the linear drain to ensure proper drainage.
If you choose to not touch each side or back wall, it is recommended to leave a space of at least 2″ on that/those side(s) for aesthetic purposes. A smaller space will make it hard to cut a proper sized tile and seems to be unsightly when filled with a thick grout line.
Recommended Products:
Both the DERA-Line and GARDA-Line standard or custom are equally well suited to an off wall installation. If one of our 9 standard sizes (30,32,36,40,44,48,54,60, 72 inch) does not work and you do not have flexibility in your plans our custom option allows you to specify an overall length and the position of the outlet in the lower channel. DERA-Line is more suited towards a mechanical clamp down drain, traditional liner waterproofing installation while the GARDA-Line is better suited to using a bonded membrane (GARDA Membrane) or liquid waterproofing.
Off-wall installation
requires the remaining
area to be sloped/pitched
back to the drain
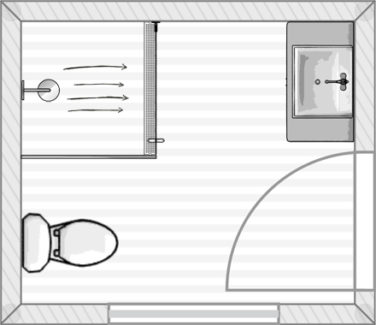
CURBLESS/BARRIER FREE INSTALLATION
Opting to forgo a barrier threshold (curb) in the wet area to go with a barrier free (curbless) installation is a decision that requires pre-planning. The assistance of a licensed professional who knows the local plumbing codes should be used to determine if a curbless application is possible.
A curbless installation has many benefits over a curb as it creates a seamless look with easy unobtrusive access to the wet area (shower) with a walker, wheel chair or from mobility issues.
An ideal curbless installation will have the floor heights between the wet (shower) and dry areas even as well as the dry area and its adjoining room. The dry area of the bathroom should be pitched slightly towards the wet (shower) area and linear drain to ensure proper drainage. Both wet (shower) and dry area should be fully waterproofed.
Each installation will have specific conditions that will determine what is involved.
Recommended Products:
GOOD Choice
DERA-Line is a good choice for a curbless installation if a standard mechanical clamp down drain needs to be used and if height is of no issue.
BEST Choice
GARDA-Line would be the best choice for this type of application as it requires minimal build up, in some cases it can be installed flush with the subfloor, a bonded membrane (GARDA Membrane) or liquid waterproofing can be used to further minimize buildup.
This application can have
the linear drain installed in any position it just forgoes
the curb at the entrance
of the wet (shower) area
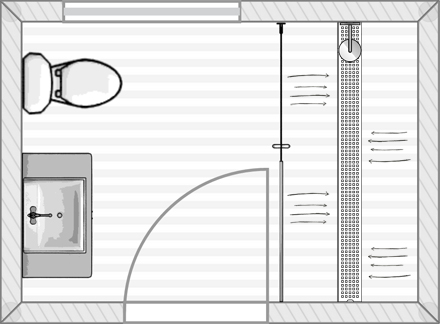
BARRIER/THRESHOLD INSTALLATION
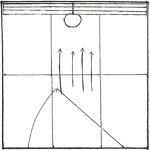
A barrier installation calls for the linear drain to be installed at the entrance of the wet (shower) area and also needs to be curbless (refer to CURBLESS/BARRIER FREE). In this type of installation the linear drain plays dual roles as a curb and a means to drain water away and MUSTrun the entire length of the entrance. Any void between the linear drain and entrance space will cause water to spill onto the dry area and pose a slip hazard that needs to be avoided.
A barrier installation is the ideal ADA shower layout as it allows easy access with a wheel chair or walker.
Recommended Products:
GOOD Choice
DERA-Line WedgeWire is a good choice for a barrier installation if a standard mechanical clamp down drain needs to be used and if height is of little/ no issue.
BEST Choice
GARDA-Line WedgeWire would be the best choice for this type of application as it requires minimal build up, in some cases it can be installed flush with the subfloor. A bonded membrane (GARDA Membrane) or liquid waterproofing can be used to further minimize buildup. The WedgeWire grate top allows for the most water to pass out of all the grate tops making it ideal in a barrier application.
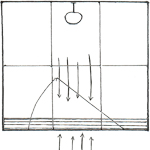
The entire bathroom is waterproofed. The dry area is slightly pitched towards the linear drain.
CENTER PITCH INSTALLATION
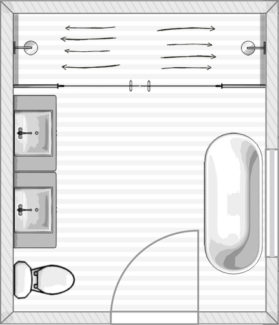
A center pitch installation places the drain in the middle of the wet area. The floor is pitched in two directions towards the linear drain. Great for bathtub replacement without the need to move the original tub plumbing
Recommended Products:
Both the DERA-Line and GARDA-Line custom are equally well suited to a center pitch installation as more than likely the outlet location will have to be modified in the channel. DERA-Line is more suited towards a mechanical clamp down drain, traditional liner waterproofing installation while the GARDA-Line is better suited to using a bonded membrane (GARDA Membrane) or liquid waterproofing.
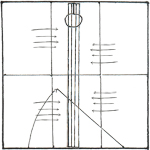
The area on each side of the linear drain is to
to sloped/pitched towards drain
Flow rates are dependent and influenced by many variables and is described as the amount of water moving within a given amount of time. This amount of water needs to be drained by the waste pipe which measures its ability to drain water away in a Gallons per Minute (GPM) measurement. All GPM measurements given for our linear and square shower drains are based on having a “head of water” that is traveling a 1⁄2” high. Different head heights will change flow rate. Without calculating a specific install, use our flow rate as a general guideline. The following variables below should be considered when choosing and locating a linear drain.
Variables to Consider
- What is flow rate of all shower fixtures? (EPAct 92 standards sets a maximum flow rate of 2.5 gpm per fixture)
- Are there multiple shower valves/fixtures/body jets?
- What is the water pressure or PSI of the site location?
- Will the fixtures operate at the local plumbing code’s legal gallons per minute?
- Will the flow restrictors be removed from the fixtures?
The answers to the above questions are put into an equation that will help determine the proper drain, if multiple outlets are necessary and if a 1-1/2”, 2” or 3” outlet is needed. These variables will vary in each new situation making it difficult to calculate an absolute flow rate. Most US residential installations use a 2” waste line, which has an average capacity of 9 GPM at 1⁄2” head of water, assuming proper venting. One common way to increase this GPM is to add an additional 2” outlets and tying them to a 3” waste line, which will significantly increase the flow rate to 21 GPM.
Outlet needs will vary whether they are intended for indoor or outdoor use. Our products are designed to be used for both indoor and outdoor use unless otherwise specified. Our linear channel and square drains come with a 2” outlet that can easily be connected to a 2 or 1-1/2” waste pipe.
For indoor installations we recommend an outlet every 30”. For example, on a 60” length drain, if the outlet is centered, it is considered to have 30” on either side. In the same example, if the outlet is offset 10” from one side, we would recommend a secondary outlet. Our Custom service allows you to specify the length and outlet position along with having multiple outlets.
Outdoor installations: Our outdoor line of drains can be hooked up to either 2 3” or 4” Sch. 40 pipe.
Outlet frequency is dependent on drain application and geographic location. Please contact us with questions regarding your specific installation.
The type of waterproofing being used can help determine which linear drain series (DERA-Line or GARDA-Line) to specify.
Using a traditional type of waterproofing, a professional will typically build a shower pan in the wet (shower) area with PVC, Vinyl, Lead, Hot Mop, Copper or Fiberglass material and connect to the waste line with a mechanical clamp down drain. DERA-Line would be recommended for this type of installation.
If using a modern type of waterproofing such as a bonded membrane (GARDA Membrane) or liquid waterproofing, requiring minimum build up and is much better suited to a no curb shower installation GARDA-Line would be recommended. This type of installation usually uses a no-hub connection, connecting to the waste pipe by a rubber coupling.
Common Methods Using a Mechanical Clamp Down Floor Drain
CPE Membrane (Chlorinated Polyethylene)
A rubber like texture, the membrane is layered between mortar beds and corners are folded to create the shower pan liner. If the shower pan area is larger than the roll dimension, it must be seamed or joined together. Tile cannot bond directly to waterproofing.
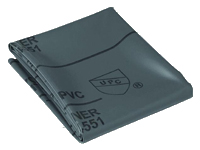
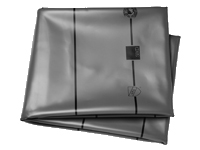
PVC Membrane/Vinyl Liner (Polyvinyl Chloride)
A rubber like texture, the membrane is layered between mortar beds and corners are folded to create the shower pan liner. If the shower pan area is larger than the roll dimension, it must be seamed or joined together. Tile cannot bond directly to waterproofing.

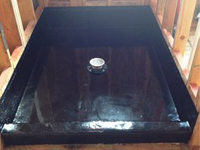
Lead Pan/Copper Pan
A metal sheet that is formed to create the shower pan area then waterproofed using one of the stated methods. A membrane is layered between mortar beds and the corners are folded to create the shower pan liner. If the shower pan area is larger than the sheet dimension, the lead material must be welded together. This install is more common in metropolitan areas where code may require a metal pan.
Hot Mop (Tar)
Heated liquid tar is applied or ”mopped” on the shower area to bed three layers of felt together to make a waterproof pan for your shower. The corners are reinforced with fiberglass bedded into the asphalt. This installation is most common in California.
Common Methods Using a Bonded Flange
GARDA Bonded Membrane
Sheet membrane that bonds directly to the drain flange with an adhesive. Corners (in and out) are available to avoid folding. If the shower pan area is larger than the roll dimensions, it must be seamed or joined together. Tile can bond directly to waterproofing.
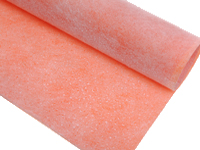
Liquid
Roll or paint-on liquid membrane that can be applied on floors, walls, and ceilings and bonds directly to the drain flange. Corners and seams are reinforced with a fiberglass mesh then painted over. Tile can bond directly to waterproofing.
Our stainless steel products are made of 304 stainless and require no special maintenance. This material is non-porous, hygienic, rust-free, resistant to mold and fungi and extremely durable. DO NOT use any abrasive cleaners or allow household cleaning agents, such as bleach, sit on your drain cover for a long period of time. Stainless steel does not rust but external factors may have caused ”surface” rust which can be removed using a scour pad, always brushing in the direction of the grain. A scour pad can also be used to refresh the look of any grate top with a brushed satin finish by gently brushing the direction of the grain.
All cleaning agents must be free of hydrochloric and hydrofluoric acid.
The grate may be removed to clean the channel body and the drainpipe. Stainless steel grates exposed to the environment or aggressive substances should be cleaned periodically using a mild household cleaner. Regular cleaning maintains the neat appearance of stainless steel and reduces the risk of corrosion.
The information provided in this package are general guidelines and a licensed professional should always be used when installing our products. Please contact us with any additional questions you may have.